Today I needed to test whether or not a specific TCP/IP port on a firewall/server was open and whether or not traffic could successfully flow via that port without firewall interference. I needed to do this independent of the normal server application that handles this for testing purposes. I just needed to make sure the firewall aspect was all set to go.
Well, why not solve this problem with netcat? Here's how I did it...
First, I put a box booted into Knoppix at Site A and a Mac with Mountain Lion at Site B. (Netcat also exists for Windows.) I then disabled the Mountain Lion firewall temporarily and started up the netcat server at Site B:
nc -vl 666
The v is for verbose of course and the l tells it to be the listener/server. The 666 is the port it will listen on, lol. (All IP addresses and ports have been changed to protect the innocent.)
At Site A, I then had someone run this command on the Knoppix rig:
nc -v 172.31.31.31 666
This caused netcat to connect to the remote server via its IP address on port 666. At that point, I started chatting over the command line back and forth with the person at Site A like as if we were instant messaging. Who knew this could be so fun?! When I typed something on my screen and pressed enter, it appeared on their command line terminal and vice versa. Interestingly, until I solved a firewall issue, the netcat client would connect but when you typed text, you couldn't see it on the other end.
This utility is very useful and this post only shows one of many things netcat can do. By default, netcat uses TCP. For checking UDP, you can simply add the u switch to the command from both the server and the client. The 4 switch can also force netcat to use IPv4 which will help avoid problems.
This was a very lightweight, portable and easy way to test connectivity on a specific port and required no installation or configuration at all. This also allowed me to test completely independent of any normal server applications, etc. to rule out the possibility of any firewall filtering. [does happy little geek dance]
There are apps out there that forward your SMS to your email but in my experience they all either don't work, or cost money. Being the cheapskate that I am, definitely wasn't going to pay money for something like that, so I started brainstorming.
I needed something to be running on my Android phone that would grab my texts and email them to me. That way if I get an SMS and my phone is in the other room charging or something I could see it on my iPad, etc. Using Google Voice for this kind of stuff is not a perfect solution because they only forward SMS that was sent to your Google number, not to your actual cell phone number.
I played around with a couple of apps and never could get the email feature to work. But I did get the feature to forward the SMS to another phone number to work, however. So I setup the free Android app "SMS Forwarding" to forward to my email via my IFTTT phone number and problem solved! Here's how to do it:
2. Setup my shared IFTTT recipe which you can find here: https://ifttt.com/recipes/66951. You'll have to confirm your phone number and email address with IFTTT and what not but it's pretty self-explanatory.
3. Install free Android app "SMS Forwarding" on your Android phone. I believe the version I am using is 1.4.3.
4. Setup the "SMS Forwarding" app to forward all your SMS messages to your IFTTT phone number. To do this, you will open the app, check "Enable Forwarding" and check "Forward with SMS". Then select "Destination Number" and enter your IFTTT phone number. You can find your IFTTT phone number by viewing your IFTTT recipe or your IFTTT SMS channel. Here's a screenshot of the app before configuration has taken place. (Don't copy these settings.)
5. Test it out. It should be good to go now!! Mine's working great! You can also setup "SMS Forwarding" to notify you of missed calls and low battery but I haven't tried those yet. Be sure to comment if you try them!
BTW, ifttt.com is awesome! There are a zillion different things you can do with this free service...
Dude, by default they intercept all customers' DNS queries and redirect them to their DNS servers. Then, they answer the DNS queries with their servers and spoof the originating server within the DNS response to make it look like they didn't intercept it. They're a regular man-in-the-middle! Total lameness.
Now, normally this wouldn't bother me too much because I would prefer to use an ISP's DNS servers. They will typically be your fastest resource for a DNS response. But spoofing responses to me? That's over the top. What if I wanna use OpenDNS to filter my internet? Or what if I just simply wanna troubleshoot a DNS issue by querying another ISP's DNS server? No go.
I know why they do this. They are trying to control bandwidth on their end. But this is a little extreme.
There's another side to this: My ISP's DNS servers stink!! They go down for 10 minutes at a time without warning. During these periodic outages I can ping by IP address but not by name and the internet is effectively dead. Total lameness.
So…We have DNS servers that aren't reliable and we have an ISP that forces you to use the bad DNS servers. Great situation!
After fighting with my ISP's customer service and getting nowhere, I decided it was time to take matters into my own hands and solve this problem myself.
First, I proved this was indeed the problem by setting my WZR-HP-G300NH2/Gargoyle (see previous post) router to use Google's DNS servers and then checking the logs. The logs showed that I was actually talking to my ISP's DNS servers even when I made queries to Google!
I started thinking…They've got to be intercepting this based on port number…What if there was a DNS server out there somewhere that actually listened on an alternate port? Lo, and behold there is! OpenDNS' servers listen on both 53 and 5353! Now all I needed to do was make make Gargoyle/OpenWRT talk to their servers on the alternate port, thus circumventing my ISP's DNS servers!
Using a wiki designed for setting up DNSCrypt on OpenWRT (which maybe I will setup sometime), I SSHed to the router and backed up /etc/config/dhcp and then edited it using vi (I also backed up my config from the web interface):
cp /etc/config/dhcp /etc/config/dhcp.bak
vi /etc/config/dhcp
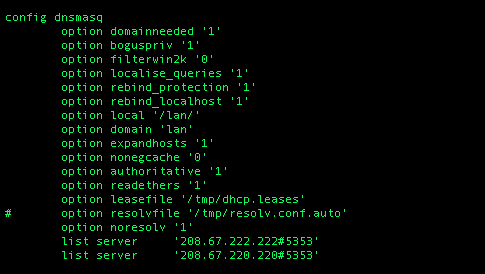
If you don't know how to use vi, check here. As shown below, under the "config dnsmasq" section I then commented the "option resolvfile" line and added 3 more lines under that line:
EDIT: Just to clarify, here are the three lines I added below the commented line:
option noresolv '1'
list server '208.67.222.222#5353'
list server '208.67.220.220#5353'
(Make sure you match the formatting/spacing shown in the image.)
As you can see, the last 2 lines tell the router to use OpenDNS' servers and talk to them on alternate port 5353. Then I created an OpenDNS account (not necessary) and restarted the router's DNS daemon:
/etc/init.d/dnsmasq restart
...Now OpenDNS has a page at http://internetbadguys.comthat they block just for testing purposes...so I went to a computer to see if I was successfully blocked (I cleared the DNS cache on the computer first):
Good! Here's what would have showed had I not been successfully blocked by OpenDNS' filtering:
I also checked my router logs and found lots of entries with 208.67.222.222:5353:
Very good!! I searched my logs further for any queries to my ISP's DNS server and found none! I then backed up my router config, flushed the DNS cache on my boxes and laughed all the way home:
Windows: ipconfig/flushdns
Mac OS X ML: sudo killall -HUP mDNSResponder
Today I needed to determine the public IP address that my home network was using but I was not physically located at home and didn't have a means of remote access into my network without the IP address. (I'm working on getting dynamic DNS and remote access and all that but it isn't up yet.)
So, I thought really hard about what I could do and it came to me...
I happened to know that there was a computer on my home network with a browser window opened to Gmail...So I logged into Gmail from my remote location and scrolled all the way down. In the bottom right hand corner, this was displayed:
I clicked "Details" and there was my home IP! This saved my bacon!
Well I bricked my brand new router! How thrilling!
Of course, I also unbricked it which was fun, too, I guess.
I bought a Buffalo WZR-HP-G300NH router from newegg.com because I wanted to put a free custom firmware called Gargoyle on it. Gargoyle is a front end for OpenWRT and specializes in simplifying the process of configuring bandwidth limitations. You can throttle down those bandwidth hoggers that are killing your internet, etc. So basically you h@ck your router to do more things than it was designed to do. Fun. This is my first time to venture into custom firmware and here's my brick story:
When my router arrived in the mail it turned out to be a WZR-HP-G300NH2 instead of a WZR-HP-G300NH and I was distracted and kinda just didn't care/notice too much I guess. (dur...) I logged into the router via telnet and HTTP and was very impressed by the ridiculous amount of features. The router comes with a Buffalo branded (weird!) version of DD-WRT which is sort of a cousin to OpenWRT and it was pretty cool stuff!
Of course, I wanted Gargoyle instead so after browsing around on the firmware a bit for fun, I used this (warning: do not use) method to update the firmware. However, I used the wrong firmware image because the wiki I was going by was designed for the router that was supposed to have been shipped to me by newegg.com and not the one that actually came. The commands I ran while telneted into the router were as follows (DO NOT RUN THESE COMMANDS):
cd /tmp wget http://www.gargoyle-router.com/downloads/images/ar71xx/gargoyle_1.4.4-ar71xx-wzr-hp-g300nh-squashfs-sysupgrade.bin
mtd -e linux -r write gargoyle_1.4.4-ar71xx-wzr-hp-g300nh-squashfs-sysupgrade.bin linux
DO NOT USE THESE COMMANDS for this router, however. Unless you wanna brick it, of course. I'll show you the right way in a bit here. (If I would have just used the correct file, I probably would have been okay.) After this, the router came up with a solid red light and would not ping at either its old IP of 192.168.11.1 or the default Gargoyle IP of 192.168.1.1. Oopsy........
After a lot of research, forum advice, blood, sweat and tears, I successfully unbricked it using TFTP. I learned that there is a short 4 second window about 10 seconds or so into boot in which the router will accept a TFTP PUT from a specific IP address only. There also must be a static ARP entry on your computer for a generic MAC address that the router has during boot.
1. I turned off WiFi, just to make sure my computer wouldn't try to talk to the router through the wireless connection
2. Then I gave my wired Ethernet connection en0 the IP address of 192.168.11.2 and the subnet mask of 255.255.255.0. This can be done through System preferences>Network>Configure IPv4 = Manually. Just leave the router space blank.
3. Next, I went to a Terminal and confirmed that the IP for interface en0 took by running: ifconfig en0
4. Then it was time to create a static ARP entry for the router and change to the Downloads folder:
sudo arp -da (clears ARP cache) sudo arp -s 192.168.11.1 02:aa:bb:cc:dd:1a (create a static ARP entry for the generic MAC address that the router defaults to) arp -a (make sure that the static entry took) cd Downloads (This is case-sensitive and changes us to the directory where I downloaded the firmware to.)
5. I then unplugged everything from the router and plugged a network cable from my Mac to the LAN port that is right next to the blue WAN port on the router -- but left the power to the router unplugged.
6. This next part was the most tricky. You have to boot up the router and then start barraging it with PUT commands via TFTP until it connects. The router will only listen on 192.168.11.1 and will only listen to your computer if your computer has the address 192.168.11.2. Fussy! It starts listening at about 10 seconds into boot and only listens for about 4 seconds. It can be tricky to catch it at just the right time. I first tried it with a couple of Mac TFTP applications but that didn't work. I then tried it from the command line, as shown below. However, it still wouldn't work after many, many attempts. I must admit that I became very frustrated at this point. Hack1ng was no longer feeling quite as fun, especially knowing that I may have permanently bricked my brand new router! Finally, I replaced my network cable and tried again and again some more until I got it. Still can't believe that my network cable was apparently bad. Crazy. I had even tried putting a switch between them earlier. (I read somewhere that sometimes there can be an issue with Windows taking a long time to bring up the NIC and ruining the timing for this and I thought it might apply to Mac. The way to get around this is to put a switch between the router and the computer and let the computer successfully negotiate its switchport connection before powering the router on. A low-grade dumb switch will likely do better at quick negotiation, as opposed to a super-duper switch with too many features, fyi.) So here are the Mac TFTP commands I ran from the terminal and their results...Right after the first PUT command is where I plugged the router's power in immediately and then kept hitting up arrow and then enter over and over again on my Mac until it finally took:
tftp 192.168.11.1 tftp> binary tftp> rexmt 1 tftp> timeout 30 tftp> trace Packet tracing on. tftp> put gargoyle_1.5.8-ar71xx-generic-wzr-hp-g300nh2-squashfs-tftp.bin(Plug the router in immediately after this command! Then keep hitting up-arrow and enter over and over again to repeat the command!!) sent WRQ <file=openwrt-ar71xx-generic-wzr-hp-g300nh2-squashfs-tftp.bin, mode=octet> tftp: sendto: Can't assign requested address tftp> put gargoyle_1.5.8-ar71xx-generic-wzr-hp-g300nh2-squashfs-tftp.bin sent WRQ <file=openwrt-ar71xx-generic-wzr-hp-g300nh2-squashfs-tftp.bin, mode=octet> tftp: sendto: Can't assign requested address tftp> put gargoyle_1.5.8-ar71xx-generic-wzr-hp-g300nh2-squashfs-tftp.bin sent WRQ <file=openwrt-ar71xx-generic-wzr-hp-g300nh2-squashfs-tftp.bin, mode=octet> tftp: sendto: Can't assign requested address tftp> put gargoyle_1.5.8-ar71xx-generic-wzr-hp-g300nh2-squashfs-tftp.bin sent WRQ <file=openwrt-ar71xx-generic-wzr-hp-g300nh2-squashfs-tftp.bin, mode=octet> tftp: sendto: Can't assign requested address tftp> put gargoyle_1.5.8-ar71xx-generic-wzr-hp-g300nh2-squashfs-tftp.bin sent WRQ <file=openwrt-ar71xx-generic-wzr-hp-g300nh2-squashfs-tftp.bin, mode=octet> tftp: sendto: Can't assign requested address tftp> put gargoyle_1.5.8-ar71xx-generic-wzr-hp-g300nh2-squashfs-tftp.bin sent WRQ <file=openwrt-ar71xx-generic-wzr-hp-g300nh2-squashfs-tftp.bin, mode=octet> tftp: sendto: Can't assign requested address tftp> put gargoyle_1.5.8-ar71xx-generic-wzr-hp-g300nh2-squashfs-tftp.bin sent WRQ <file=openwrt-ar71xx-generic-wzr-hp-g300nh2-squashfs-tftp.bin, mode=octet> tftp: sendto: Can't assign requested address tftp> put gargoyle_1.5.8-ar71xx-generic-wzr-hp-g300nh2-squashfs-tftp.bin sent WRQ <file=openwrt-ar71xx-generic-wzr-hp-g300nh2-squashfs-tftp.bin, mode=octet> tftp: sendto: Can't assign requested address tftp> put gargoyle_1.5.8-ar71xx-generic-wzr-hp-g300nh2-squashfs-tftp.bin sent WRQ <file=openwrt-ar71xx-generic-wzr-hp-g300nh2-squashfs-tftp.bin, mode=octet> ^[[A ^[[A sent WRQ <file=openwrt-ar71xx-generic-wzr-hp-g300nh2-squashfs-tftp.bin, mode=octet> ^[[A ^[[A sent WRQ <file=openwrt-ar71xx-generic-wzr-hp-g300nh2-squashfs-tftp.bin, mode=octet> ^[[A ^[[Asent WRQ <file=openwrt-ar71xx-generic-wzr-hp-g300nh2-squashfs-tftp.bin, mode=octet> sent WRQ <file=openwrt-ar71xx-generic-wzr-hp-g300nh2-squashfs-tftp.bin, mode=octet> sent WRQ <file=openwrt-ar71xx-generic-wzr-hp-g300nh2-squashfs-tftp.bin, mode=octet> sent WRQ <file=openwrt-ar71xx-generic-wzr-hp-g300nh2-squashfs-tftp.bin, mode=octet> sent WRQ <file=openwrt-ar71xx-generic-wzr-hp-g300nh2-squashfs-tftp.bin, mode=octet> received ACK <block=0> (Here it started working so I quit repeating the command.) sent DATA <block=1, 512 bytes> received ACK <block=1> sent DATA <block=2, 512 bytes> received ACK <block=2>
etc., etc.….
sent DATA <block=5120, 512 bytes> received ACK <block=5120> sent DATA <block=5121, 36 bytes> received ACK <block=5121> Sent 2621476 bytes in 8.1 seconds
6. Once the TFTP was complete, I deleted the static ARP entry on my Mac:
7. ...And changed my IP from Manual to DHCP again (reverse of step 2)
8. I then set ping to sound an alert when the router came up: ping -a 192.168.1.1
9. When the router came up I logged in via HTTP and SSH at 192.168.1.1!
I have to say, after trying Gargoyle for a few days now, it's awesome. It may not be super pretty looking, but the bandwidth control features, etc. are out of this world. And now I've been initiated into the world of custom firmware! (And bricking...!)
Denied! ;)
If you want to try it before committing, there's a really awesome online read-only version of the webUI you can try!:
Gargoyle isn't for everybody, but free custom firmware is! Or at least it's for everybody who wants to get super-duper business-grade features on a home router!!
Easy peasy. Even easier than it was with Server 2003. Thanks Microsoft! My stolen and modified method of resetting the domain admin password (NOT local admin!!!) is thus:
1. Boot into Trinity Rescue Kit live OS (google it).
2. Choose the option to mount all filesystems. (Do NOT choose the menu option to reset the password. It's only for local user accounts, not domain admin.)
3. If it fails, try the option to recognize more hard disk controllers and then try mounting again. I've had this save me before.
4. Choose the go to shell option
5. You'll have to know some basic Linux navigation to do it my way, so see google if you prefer the method of using a Windows install disc: Navigate to the Windows folder and then the System32 folder
6. Rename Utilman.exe to Utilman.exe.bak
7. Rename cmd.exe to Utilman.exe
8. Reboot into Windows
9. At the login screen, press Windows-key+U
10. Type: net user administrator password (replace password with your new one)
11. Close the CLI
12. Login
13. Rename the above files back like they were. This may require you taking ownership/granting Full Control to yourself (you can google that, too)
14. Exhale...
I finally have a Macbook Pro! Fun! Hey did you know (as if this was the coolest thing about getting a Mac) that you can use the -A switch to have it start beeping when your target host is no longer pingable or vice versa?
Beep when host isnot pingable:
ping -A google.com
Beep when host is replying to ping:
ping -a google.com
Don't forget that... A. Unix based OS's like Mac ping forever by default without the -c option (check the man page with "man ping") and B. It doesn't accept the option after the hostname -- it must come before the hostname. Enjoy!!
UPDATE: Funny, I haven't looked at the man page for ping in ages and you can apparently do this on Red Hat, etc., too. (Duh.) Who ever looks at the man page for something as simple as ping? LOL.
So one of the problems with security in code writing is that although the user interface only lists specific options for drop down fields, etc. the server code may not be verifying that the form data actually sent back by the user indeed falls within the specifications. In other words, the server sends the client a web page saying, "Do you choose A, B, C, D or E?" but it actually will accept F as input well! This is bad practice and in some cases can be a serious vulnerability.
Today's hack involves Facebook, so that's fun. Our hack will send back data to the Facebook server that the webpage was not intended to send but we aren't going to hack anybody's account or anything, so don't get too excited.
The hack comes from mad PHP super ninja Steven Corbett of motionmods.com who is my good buddy. Steven has figured out a way to hack Facebook's Timeline so that so called Life Events can be generated as having occured in the future.
First, I'll give you the hack, then we'll interview Steven for more detail on the hack and what can be done to prevent it.
What you'll need for the hack:
Timeline enabled on your Facebook profile
Google Chrome (Firefox could work, too, but the instructions below are for Chrome.) I'm using Windows 7 today, fyi.
Okay, so here's the hack:
1. Browse to your Facebook profile and choose Life Event
2. You'll have varying levels of hacking success with different Life Events, but for the moment we'll choose Travel & Experiences...>Tattoo or Piercing...
3. You'll notice that the When drop-down only goes up to the current year (2012). We'll modify things so that we can go to a higher year. We can go up to 2037 for this hack. As to why 2037, um maybe it has something to do with this? To modify the year, RIGHT click on the drop down and choose Inspect element.
4. In the elements pane, expand the following line which is highlighted automatically by clicking the little arrow on the left:
5. Find the line below and change the option value from 2012 to a year in the future up until 2037:
<option value="2012" selected="1">2012</option>
6. Fill in the Story field, click the drop down next to the Save button for your privacy level and then click Save. Clicking Save may not appear to do anything because for whatever reason the hack freaks it out and the window doesn't close, but if you check your timeline it does save properly. Yay.
Here's a video of me doing the hack. I've got a very small screenshot size set intentionally in order to maintain some level of privacy on my Facebook. The good news though is that this video is much better quality than my last one!
So what can a developer do to protect against this? Let's ask mad PHP super ninja Steven Corbett of motionmods.com...Below is an interview I did with Steven...
James: Nice work on the Facebook timeline hack, Steven. When I saw your Timeline posts in the future in my feed I immediately wanted to know how you did this. What inspired this? A little too much coffee and a desire to break stuff? Tell us about your inner hacker self.
Steven: The coffee probably did have something to do with it, but I had run into an issue with a couple of clients where they were having weird, spammy content posted through the forms on their sites. Or so we thought. Funny thing was, some of the values coming through weren't even options in the forms. As it turned out, they were being posted from remote servers using cURL, so the options on the forms were bypassed and completely irrelevant- these spammers were submitting whatever their despicable hearts desired!
Anyway, it got me wondering how Facebook handled unexpected values in user input, so on a whim I gave it a whirl, and was pretty surprised to see that sometimes they don't! :)
James: Okay so I'm not a developer...help me out here. So when we are using Inspect element to edit the code, we're basically saying to the server: "Thanks for the webpage you sent to our browser but we're gonna manipulate your webpage with new capabilities to send you back stuff you didn't expect" ...right? Can you elaborate?
Steven: Pretty much! The server sends you the page that it wants you to see, with the features and options that it thinks you should have, but if you feel that you deserve more, you can tweak it to suit using something like Dev Tools in Chrome/Chromium, or Firebug in Firefox. Even IE can do this stuff now, if you're ok with looking like Grandma (and if you don't mind the extra 13 steps required for each action).
I used to leave notes for my wife on Google's home page this way...and once or twice spoofed a cold, heartless message from a trusted friend on someone's FB wall when they left it open. :)
James: Fun! So what can developers do to protect their server code from allowing unexpected input? Could you give us some generic example server side code?
Steven: With all the buzz around javascript/jQuery form validation, it's way too easy to forget that anything coming from the client-side can be manipulated and can't be trusted. Server-side validation may be boring, but it's essential!
Here's an oversimplified PHP example of something Facebook could do in this particular scenario:
This takes the input, makes sure that the values are integers (since that's what Facebook is using), then converts them to a timestamp which can be checked against the current timestamp to ensure that the value is within what was expected.
James: Great! Well, thanks for the hack, Steven. Hey, tell us a bit about what you do at motionmods.com...
Steven: Hmm...besides pretending to be an expert on a media CMS that no one knows anything about, I custom build PHPmotion-based video sites. More often than not I end up breaking stuff majorly, but it's fun anyway, and I get to stay home all day and call it a job.
Using
a packet sniffer to snoop on LAN traffic isn't as easy as it used to be
when legacy hubs were in most networks instead of modern day switches.
This is because on a hub, all Ethernet ports are on one collision domain
but on a switch, each port has its own collision domain...Er, at least
until the switch gets hacked, which we'll do here in a minute. A
collision domain means that each host has to wait until the other hosts
are done talking before they can have a turn sharing the wire. Sort of
like a party telephone line back in the day. (No, I'm not that old.) The
cumbersome CSMA/CD (Carrier Sense Multiple Access / Collision
Detection) protocol is used to make the hosts take their turn without interfering
with each other. A switch is far more efficient because each port is on
its own collision domain and therefore there are no collisions. If
switchport 1 wants to talk to switchport 2, the switch efficiently sends
the traffic between 1 and 2 without sending this data inefficiently out
all ports like the party line style hub does. Very inconvenient for a
hacker.
One of the most common vulnerabilities in any
computer technology is the buffer overflow. If you can fill up the
victim with more data than it can handle, it often starts to behave
erratically. Hackers like this. Thus is the vulnerability of a switch
without proper security measures in place. A switch's CAM (Content
addressable memory) table -- also known as MAC address table -- can be
buffer overflowed with the right tools. The MAC table is used by the
switch to determine where everybody is. Host A has such-and-so MAC
address and Host B has yatta-yatta MAC address. It learns the MACs from
the hosts and stores them in the MAC table. Kind of almost reminds one
of resolving DNS names to IP addresses, I suppose. Instead, we're resolving IP addresses to MAC addresses. If Hosts A asks where
Host B is (by IP address) and the switch doesn't know about Host B yet,
it will send a layer 2 broadcast (to ff:ff:ff:ff:ff:ff) asking who has
the IP address associated with Host B. When Host B answers, it provides
it's MAC address to the switch who stores it in the MAC table. Now the next time somebody
asks for Host B (by IP address), the switch already knows Host B's MAC address and what
port is associated with that MAC address.
Cisco Catalyst 2950 switch
So what if this MAC table got too full? (Muahaha.) Wonder what
would happen then? Well, if the switch doesn't have proper security
measures in place (and many do not), a buffer overflow DoS
can 'cause the switch to fail-open and start behaving like a hub for any new hosts who
connect! Hacker's dream come true for sniffing. Now when Host A requests to talk with newly introduced Host B, the switch can't
find it's MAC in the MAC table and it can't add it to the MAC table because it is full so
it just freaks out and sends the traffic out all ports.
So what if a blackhat either got physical access to
one of your switches, or compromised one of your boxes remotely so that
s/he could sniff any unencrypted passwords in plaintext? That's what we're going to simulate below.
The attack consists of barraging the switch with malformed ARP traffic which fills up the switch's CAM table. Keep in mind, this was done in my test lab on a segregated LAN and
should not be performed on a production network. Bad things can happen
like going to jail for wiretapping or worse yet, crashing your switch.
Do I need to repeat this?: DO NOT PERFORM THIS ON A PRODUCTION NETWORK.
Operating system: Cisco IOS Release 12.1(22)EA8a
Connection for management: Cisco DB9 to RJ45 Console Cable
(Both victims and the attacker were plugged into this switch)
--Attacker--
Operating system: Fedora 16
IP address: 192.168.200.4
Switchport: 3
My objective was for the
attacker to be able to sniff an FTP password as it went across the LAN
from the victim client to the victim server.
There
are many ways you could setup this test network but I'm going show you
how I setup mine. I'm weird about using live CDs so I started with
booting my victim server box into Puppy Linux. After it finished
booting, I went to the menu and chose Setup>Internet Connection
Wizard>Internet by wired or wireless LAN>Network Wizard. Then I
clicked on the appropriate interface name and setup a static IP of
192.168.200.2 and 255.255.255.0 as the mask. The rest I left as 0.0.0.0
because they won't be needed in my test lab. I then started the FTP
server via the menu item Network>PureFTPd FTP Server. I made sure
that "Prevent user root connections" was unchecked and that "Prevent
anonymous connections" was checked. I set a root password by going
to menu item Utility>ROXTerm and typing passwd. Okay, now our litte
insta-FTP server has been setup...
Victim FTP server running Puppy Linux with PureFTPd
Next, I booted my victim client into DSL (Linux).
Yeah, like I say, I'm kind of a live CD addict. For my DSL box, I went
to the menu and chose Setup>Net Setup>netcardconf. I set my
interface up on an IP of 192.168.200.3 and the mask as 255.255.255.0. I
took the defaults on the rest of the options cause it doesn't really
matter in my test lab. I then made sure the client could ping and FTP
the server after opening a terminal from the menu: XShells>Root
Access>Dark.
Victim FTP client running DSL
Okay, now to setup the attacker. I booted my
attacking box into its native OS (I know...boring) of Fedora 16. My
first attempts involved using Ettercap to perform the MAC flood which gave me problems. Ettercap is a great tool, but I couldn't get it to behave on my box. It
would crash a lot. Also, even with a zillion customizations to
/etc/etter.conf, it would still only trickle out my MAC flood like spit from a
baby's mouth and that wasn't cutting it. I don't know why it was so slow. The firewall was off. So after a bunch of crazy
fooling around with Ettercap to no avail, I reverted to the very
straightforward macof tool for my MAC flood. It worked awesomely. I'll
tell the exact steps in a second, but first I should mention another
huge hiccup I experienced: One caveat to this whole thing as stated
above, is that a buffer overflow DoS can only cause the switch to
start behaving like a hub for any NEW hosts who connect. Hosts who were
already in the MAC table are not going to be sniffable without maybe some
other hack. After banging my head against the wall for far too long, I
found it was necessary to clear the MAC address table on the Cisco
switch because my victims were in the table from when I performed
initial ping and FTP connectivity tests. This was causing me not to be
able to sniff the traffic and was resolved once I cleared the MAC table.
My attacking box already had sniffing tool Wireshark
installed, but I did have to install macof (which is
part of dsniff) for the MAC flood:
sudo yum install dsniff
So I opened a terminal and ran "sudo wireshark" in
order to get Wireshark going. If you don't open it this way, it won't
have the root access it needs. I then went to Capture>Interfaces and
clicked start on my interface. Next, I typed the following into the
Filter field and clicked Apply:
ip.addr == 192.168.200.3
This
filters things so that I will only see traffic to and from my victim
client. If you want, you can wait to do this so that you can watch the
malformed packets fly by when we do the MAC flood in a minute. It's kind
of a pain to apply filters while sniffing though or with large results
because it takes so much time for the application to process it. I prefer
to set the filter right away before there is too much data.
Now my sniffer is ready. One more thing. I need to
clear the MAC table on my switch because in my test environment the
victims had already talked to each other which ruins the hack. (See
above.)
I installed Putty on my attacking box, even though it
isn't realistic that the hacker would have access to my switch in my
scenario. That's okay, though. The command to install Putty was:
sudo yum install putty
I then opened Putty from a terminal, once again using sudo for root access:
sudo putty
I logged into my switch over a console cable and ran the following command, to clear the MAC address table:
clear mac address-table dynamic
And then this just to see how my MAC table was doing:
show mac address-table count
Switch in a normal state before the attack
According
to the output, I had 8,189 spaces for MAC addresses left in the table.
Sounds like a lot. But once I flood it with half-a-million MACs it won't
sound like a lot anymore.
Okay. Drumroll. This is it. Here's the attack. I went to a terminal on my attacking box and ran:
sudo macof -i eth0
(The i option is for interface, of course.)
Macof did a great job at DoSing my switch. In less
than a minute, Wireshark had already reported over 400,000 packets being spewed out. (The status bar at the bottom of the Wireshark GUI is the
place to look for this.) My switch also showed there to be no more space left in the MAC table.
Macof utility generating the DoS by spewing random MACs
Switch in a state of fail-open due to lack of space in the CAM table
At this point, I went to my victim client and typed:
ftp 192.168.200.2
The
FTP server prompted for a username and password. I of course used root
as the username and used the password I setup earlier. Meanwhile, I
watched the username and password appear in plaintext in Wireshark on my
attacking box. Yay!
The password "supersecret" being sniffed by the attacker
Below is a video of me performing the hack. It's pretty horrible quality, so sorry about that. Turns out, it's a lot harder than I thought to hold an iPhone with one hand and hack with the other. Not to mention, poor lighting, etc. Hopefully, I'll get better at the video side of blogging with time, heh....
So how can we protect ourselves from an attack like this? The most common method is to use port security. This locks the switchport down to 1 or more MAC address which are allowed to communicate. Though more commonly used to block users from placing unapproved devices on the network, port security also would prevent a MAC flood attack because the switchport could potentially shutdown the port when too many MACs try to associate themselves with the port. DHCP snooping is another method of preventing a MAC flood, but I won't go into that here.
Also, it's important to remind ourselves that FTP is not a secure protocol as the password is sent in cleartext.
Well, that's about it. There a lot of people who have documented this type of attack on various blogs and websites but this my version. I drew information from multiple sites and blogs and came up with some stuff on my own to create this proof-of-concept attack in my lab so this is the result research and network experience combined with some banging my head against a wall. Hope it was helpful to you!
Yeah, I know there isn't a huge need for an antivirus on Linux, but I wanted to have something besides ClamAV for scanning infected USB drives, etc. So I installed AVG Free, which I have been very pleased with. If you 'd like to try it, you can download AVG Free for a few different Linux distros here:
a = Scan inside archives
u = Automatically move infected object to vault
H = Use heuristics for scanning
d = Verbose mode. Multiple -d options increase verbosity. Maximum of 3 options is allowed.
Don't forget, options are case-sensitive! Also, by default avgscan scans recursively through all directories in the path specified unless you specify otherwise. See the man page for details.
I have had very good success with AVG Free for Linux and use it often for scanning USB drives that were inserted into a potentially infected Windows box so have fun!
So my problem was that I needed to ping a list of hostnames from an input file to see if they were alive. All the network scanning programs I usually use accept an input file but the file must contain IP addresses and not hostnames. Lame.
So I got on my Fedora 16 Linux box and tried fping which I hadn't looked at in a while and it was even more mega-cool than I thought. fping is a command-line Linux tool and will accept an input file with hostnames or IPs or a mix of both. It will do lots of other things, too, like resolve the hostnames to IPs
in the output, etc. and works great for scripts. Take a look at the man
page for all kinds of coolness. fping is also very fast because it pings the hosts in
parallel instead of one at a time.
Go ahead and install it and give it a whirl. On a Red Hat-based OS like mine, you can do this with:
sudo yum install fping
Below is a command that you can use to send your input text file to fping and have it send all the output to a file:
sudo fping -f scaninput.txt > scanoutput.txt 2>&1
Replace scaninput.txt with your input file and replace scanoutput.txt with your desired output filename. For my input file, I just took a list of hostnames from a spreadsheet and pasted them into a text file. The -f option is used to specify the input filename. The > of course sends the output to a file. The 2>&1 catches any error output (like a failed ping) that was originally only going to be printed on the screen and makes sure it gets sent to the output file as well. That's because a 2> redirect is different than a normal redirect. It redirects STDERR (standard error) output instead of the normal STDOUT (standard out). In our case, we are additionally sending the STDERR to STDOUT because STDOUT (default) is represented as 1 and STDERR as 2. Since STDOUT is already opened by the shell, STDERR will be
appended to STDOUT so only a > is needed and not >> which would
normally be used for appending. If you'd like to geek out on this epically, you can head over to http://www.linuxsa.org.au/tips/io-redirection.html and make your head hurt a little.
So after I got my scanoutput.txt I opened it in Excel for some cleaning up. (Hey, Microsoft Office is a decent product and my LibreOffice crashes like crazy so get off my back already!!) I used some Text to columns magic and got things looking nicely for continuing my project. Only downside was that I did have some duplicates of this nature:
[hostname1] is unreachable ICMP Host Unreachable from [x.x.x.x] for ICMP Echo sent to [hostname1] ([x.x.x.x])
Fooling around with my fping redirection did not solve this because fping apparently likes to print the output twice for unreachables even if you don't do the redirection I've specified. No problem, though. After verifying that these were indeed duplicate lines, I just sorted the column alphabetically and removed all the rows that began with ICMP Host Unreachable which took all of 10 seconds. If anybody has a better way to do this, feel free to comment.
In the future, when I need to ping a list of hostnames from an input file fping will be my tool of choice. Enjoy!
Ever wonder why there are MD5 or SHA-1 checksums listed on websites with large downloads like ISOs and stuff? In case you didn't already know, it's so you can use it to verify the integrity of your download in case there was corruption. Believe me, Chrome is the worst about corrupting downloads, but other browsers can corrupt them, too. If your wondering why that ISO you burned to a CD won't boot, you better verify the checksum. As matter of fact, if the file is over 100 MB I always check it immediately after download so I don't waste any time fiddling around with a corrupt download. You can use one of many utilities to calculate the checksum of the file you downloaded and then check it against the checksum listed on the website you downloaded it from. Some websites even have an accompanying plaintext checksum file which can be downloaded separately and queried for the checksum by some programs. If the website is lamer and doesn't list an MD5, sometimes you can get them to email it to you. Calculating checksums for files is also useful for forensics and checking the integrity of files suspected to have been compromised, etc.
There are a number of algorithms used to calculate checksums, including MD5, SHA-1, CRC32, etc. On Windows I've been using WinMD5Sum/portable for a while now to compute MD5
hashes for files, but I've been looking for a solution to
verify SHA-1 hashes because a particular site I use has them. A while back I found Microsoft's fciv, but Microsoft = less cool so I recently looked at number of other tools. Below is a list of pretty good ones I found but for me portable, lightweight and simple is important so my very fave is Marxio File Checksum Verifier. I'll tell more about it in a second.
Initially it's just a lone exe but after you open it the first time, an accompanying ini is created so you may want to find a home for these 2 files.
Open the program and choose your checksum type
Drag and drop a file you need checked
Paste the original checksum you got from the source website into the Compare with field
If you see a checkmark, your file's sum matches that of the original and all is well
If you want things even simpler, you can click the green arrow and make Marxio FCV go into minibar mode. Or if you want to play with a bajillion tweaks, click the gear button and try things like unchecking Enable stay on top or choosing Other settings>Application thread priority. Also, try some of the other buttons like the clipboard transfer and the option to create a checksum file for more fun.
If you want to have an Explorer right-click menu item for Marxio FCV, enable this via Gear Menu>Shell integration and default action>Enable/Disable or change title. Beware if you do this, however, because the program becomes less portable. Moving the executable will then break your right-click menu.
So anyway, now I can check my SHA-1's along with my MD5's so that is happiness!
Okay,
I admit it. I forgot the BIOS password on my HP Probook 6560b laptop. Dur... I
took this as a challenge though: “Oh goody, I get to kill my BIOS password!” So
I booted into UBCD and tried my favorite BIOS password murdering tools like cmospwd.
Didn’t go very well. Every time I would reboot out of the tool it would error
out at a BIOS checksum error and not let me get into the BIOS. It would then force
a reboot at which time it would restore the BIOS password. Lots of googling
didn’t do it. Lots. Apparently the TPM chip stores the password and can restore
it to the CMOS if it sees that it is gone. Security feature. Hmmm.
Sometimes
the best hack is manufacturer support, lol. The first time I contacted HP they
said I needed to drive 2 hours to an authorized vendor who I could pay to flash
the TPM. That wasn’t what I wanted to hear. So I waited about 4 months
and then contacted them again. Heh.
This
time the chat support rep had someone from “HP Complex Problem Resolution &
Quality” email me some cool instructions. As I say, sometimes the best hack comes from
the manufacturer. It worked very hunkydorily. Below are instructions to clear the TPM and reset the BIOS, with my added juicy detail. This can't be found anywhere on the internet at the time of this post from what I can tell. The needed smc.bin can be
found on my Google Sites storage here:
UPDATE: You must contact HP chat support directly and give them your UUID (easy to do) in order to get a smc.bin file which is generated for your specific device. Once you have this, you can proceed with the instructions below. Read the comments on this post for more information.
1.Save smc.bin to the root of a USB thumb drive “(or save the file to the root of drive D: HP_TOOLS)” -- I used a USB drive, btw...
2. Power the laptop off
3. Hold down Windows key + up arrow + down arrow and power the laptop on
4. Let go of the keys at the HP splashscreen
5. Press F10 repeatedly at the screen that shows up with "SMC command handled successfully"
6. This should bring you into the BIOS where you need to choose “Reset BIOS security to factory default” and confirm by choosing yes (duh)
7. Exit the BIOS, saving changes (duh)
8. When the laptop reboots, you will see the coveted prompt to clear the TPM, which is shown below.
9. Press F1 (duh again)
10. When the laptop reboots, the BIOS password is goners.
11. Feel hunkydory!
Really easy. HP didn't make me prove I was the owner or anything.
I opened the smc.bin file with Notepad 'cause I'm curious like that and some info that didn't seem like it was perhaps intended to be in there showed itself, lol:
An nslookup on these IPs showed internal-host.americas.hpqcorp.net. Curiously strong, bro. Is americas a Windows domain name then? A whois shows that 16.0.0.0/8 belongs to HP. I didn't get all crazy and port scan 'em or anything but it's pretty funny that what looks like an internal domain name, internal username and two possibly internally accessed public IPs made it into this 807 byte file. #wazatsupozzedtohappen?
Doing some googling based on that username of KNadeem did show some interesting results, including a few possible matches of former/current HP employees on LinkedIn. (This was not the username of the support rep who emailed me.) Enough fun with that, though. The lesson on this one is that there are times to engage the vendor in your hacking endeavors. Ciao!
From time to time you'll get an environment where the Windows boxes are so locked down that it's a huge pain to try to play with the settings to avoid the screensaver locking the screen, etc. Also, there may be some cases where you just need to temporarily get around a screensaver/power settings for a Powerpoint or something. Maybe you are on somebody else's network and don't want them to get miffed about configuration changes being made. Or maybe you have a gray hat use in which case you are a loser.
Well, these all sound like a case for getting the awesome free lightweight application Caffeine to make your life easy. Simply download and unzip the executable and run the completely portable app from your hard drive, thumb drive, network drive or cloud drive -- no admin privileges required and no install necessary! If you give onsite presentations to your customers in their conference rooms, etc. and are sick of annoying screensavers, then give it a whirl!
Basically, when you run the executable it places an icon in your taskbar and immediately starts its screensaver-toasting wonders. You can use the taskbar icon to disable it temporarily or exit. If you want to get fancy, you can use the command line switches. The beauty of it is that this is simply a standalone executable that emulates a F15 key up event every 59 seconds.
Don't forget, this app has some pretty serious security ramifications, so use with care. There are huge benefits to computers' screensavers locking the screen to require a password when inactive. If you step away for coffee and the janitor snoops on your email, you may be kicking yourself in the back of the head with great force. Consider only using this application as a temporary measure for special cases and if you are going to be within view of your computer. Don't be stupid. Don't hack yourself.
I've tested this on XP Pro 32 bit and 7 Pro 32 bit and it appears to work even without admin privileges. The maker's website also has other freeware-awesomeness apps so check them out, for sure!
In addition to the hotlink above, you can download Caffeine from my online storage here. Enjoy the Caffeine high!
UPDATE: Mac users, you can run the command "caffeinate" from the Terminal to achieve the same thing! (Run "man caffeinate" to see options.) Or, download Caffeine from the App Store!
My non-jailbroken iPhone 4, 8 GB, iOS 5.0 never worked quite right from the beginning. It was slow and unstable, requiring a reboot every other day. Then it started acting really blah and failing to open the photo app along with the camera making weird blank black photos. It got bad when it started failing to open all kinds of various apps. Also, the Windows photo/scanning wizard couldn't see it, so I am guessing there was a file system problem maybe.
I decided that since the nearest Apple store is like 2 hours away that I better start with an iOS reload. However, I didn't want to upgrade to 5.0.1 and iTunes would not let me restore to factory as 5.0 or load the 5.0 ipsw manually, despite hack attempts. (It was trying to force me to upgrade.)
Running out of time for research, I decided that it was worth a try to use Settings>General>Reset>Erase All Content and Settings. This of course deletes all of your data and so I backed up what I could first. So...yes! This actually has fixed my problem and the phone is behaving quite nicely now!
Sorry, Apple. I got around upgrading the iOS...Ha...!
If you need a quick and easy way to get the public facing IP address of your Unix/Linux server in runlevel 3 (no GUI, and therefore no browser), try this. This method is especially helpful if there is no command-line based browser installed and you don't feel like installing one. (Wget and Curl may be more likely to already be installed.)
Hints: Checkip.dyndns.com is possibly more reliable, but if you need a nicer format (just the IP only), try using icanhazip.com (lol) as shown below. Method 2b is perhaps the easiest and cleanest, but Method 1a is the most fool-proof.
UPDATE 11/15/2012: Scroll down to the bottom of this post for an even better Method 3!